|
I think this will be the last butterfly for this project for a while, since the section of the wall I'm working on has pretty much run out of space. And between my uncertainty of continuing on a different section of the wall plus me being low on supplies, it was probably a matter of time until I had to take a break.  DIFFICULTY: Apart from the two folds that shape the upper wings (which I found extremely finicky to get right, to the point that I performed the steps my own way), everything about this model is simple to execute. Shouldn't be too tough for most people. INSTRUCTION SOURCE: Here's yet another model I picked up from Joost Langeveld's website. Here's the diagram. OTHER THINGS: I don't have much else to say about this model, so I want to use this segment to reflect on the project's progress. It took close to three years to get things to where it is now, but I'm pretty happy with how the wall's turned out. Though I'd probably be content stopping here, I do still have a bunch of butterfly models I haven't folded, and three other walls I can stick stuff on, so I can start this project back up again once I resolve the logistics of everything. It's also been a ton of fun documenting the process on here (in addition to my local documentation of the project, which involves a master list and lots of PDFs). I don't know if any of these posts have been popular at all, but I hope this series has sparked even an iota of interest in origami for even just one person. THE WALL'S PROGRESS: 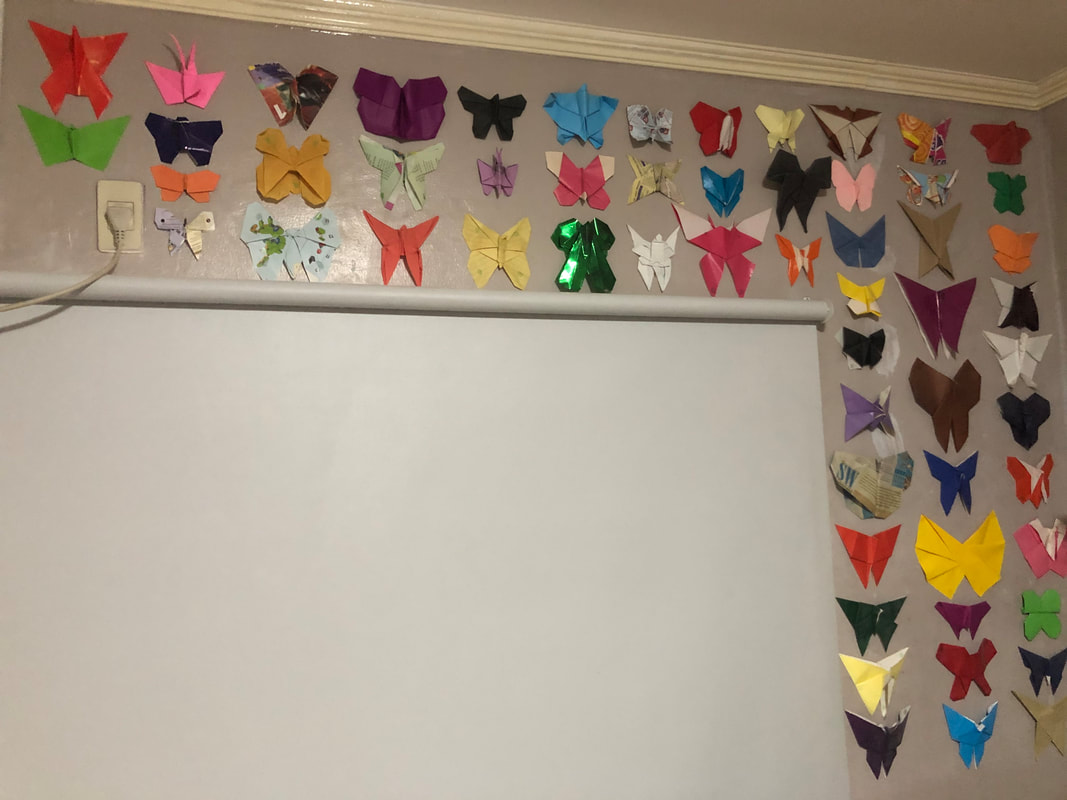 - end -
0 Comments
I'll consider this model practice for a technique I don't use a lot. 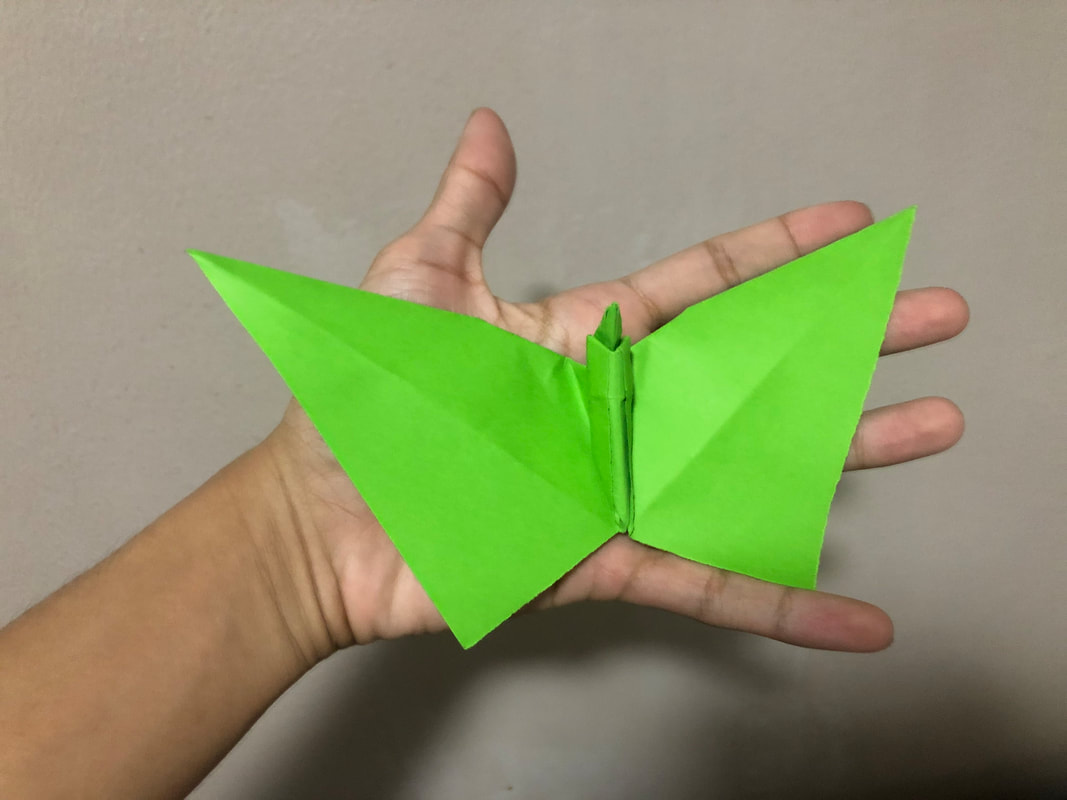 DIFFICULTY: The two steps I can see newcomers or beginners having trouble with are the main rabbit ear fold that forms the overall shape and the petal fold to form the butterfly's body, since those require somewhat precise setup creases and understanding how to collapse paper along said creases. Thankfully, this is a perfect model to practice both fold techniques, since the rest of this butterfly is simple to make. If you're having trouble getting the folds right, try making this with larger paper so you have a bit of room to work with. INSTRUCTION SOURCE: This model is credited to Dokuohtei Nakano, and I retrieved the diagrams from Eric Kenneway's book Complete Origami. OTHER THINGS: I used to hate doing rabbit ear folds back when I was starting out, because the models I'd encounter them on would have me setting them up on such inconvenient spots. I've mostly gotten over it, but I still feel the occasional "ugh" when I see that a step requires me to perform the fold. THE WALL'S PROGRESS 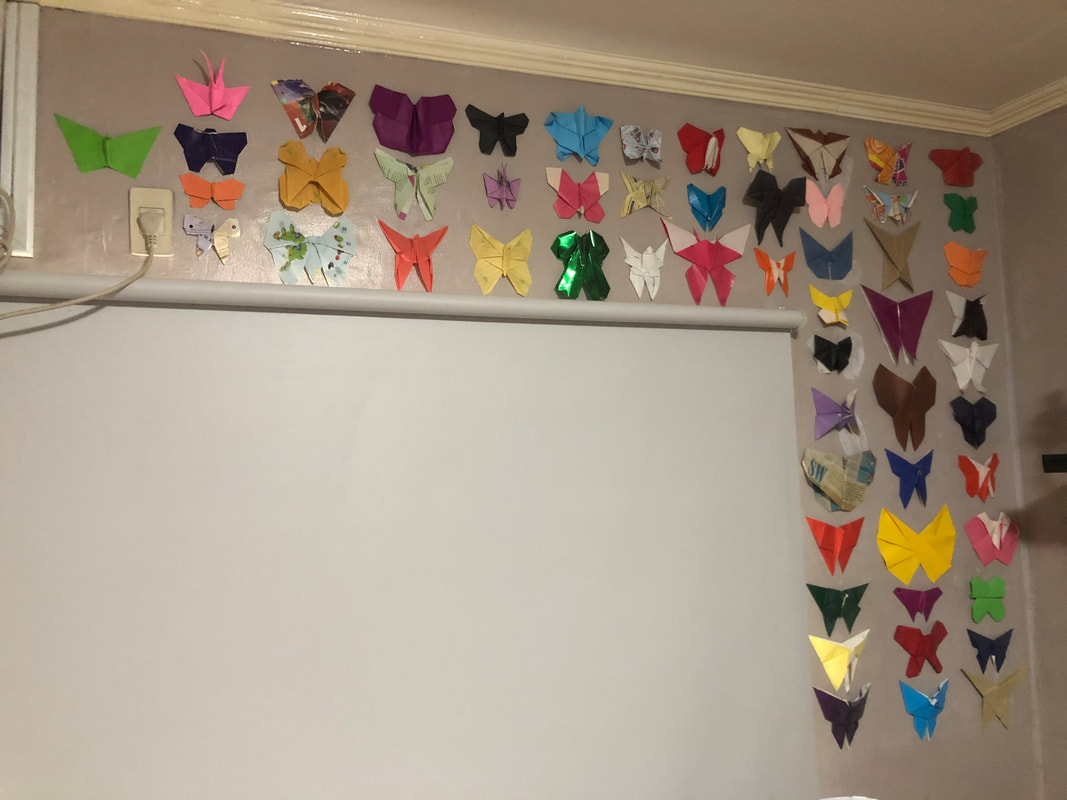 - end -
Here's something slightly different in construction, for once. 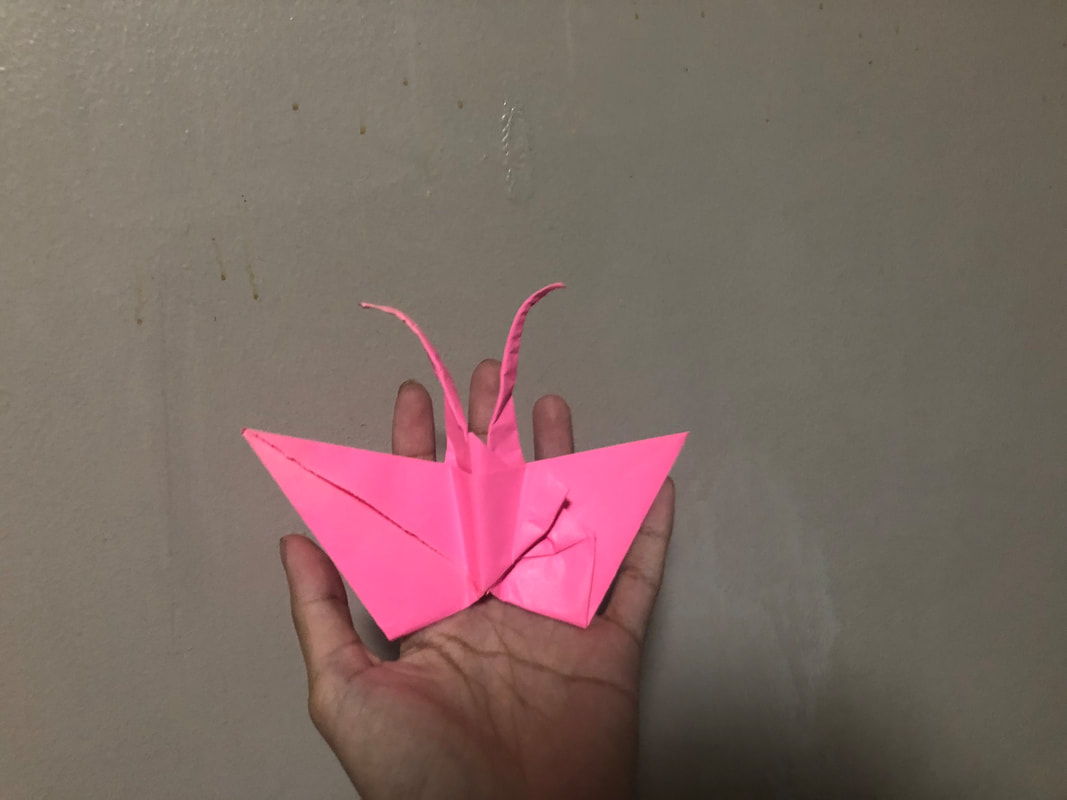 DIFFICULTY: Most of the construction of this butterfly is straightforward, since it starts out with the crane base and gets to the petal fold step. If you can make a traditional origami crane, that part will be easy. If not, the crane is a good first model to learn for beginners, so get the hang of making that first before you move onto this. Where things might get tricky is the construction of the antennae, as the squash folds to set them flat against the rest of the model took me quite a bit of doing to get right. Some of my practice models came out misaligned, and a few even ended up with tears (though the tears weren't visible). My finished product above wasn't 100% polished, either, as the squash folds I did resulted in a slightly lumpy section at the center. I advise taking things slow and careful once you get to this point. INSTRUCTION SOURCE: This is another one from Joost Langeveld. Here's the link to the diagrams. OTHER THINGS: The crane/bird base is another commonly used starting point for many origami models. Despite this, I didn't encounter it all that much in the models I folded for this project, so it was cool to make a butterfly out of the crane base. This is another butterfly with antennae, which I'm always excited about. Once again, I curled it up by rolling the antennae against a pen to give it that curved appearance. THE WALL'S PROGRESS: 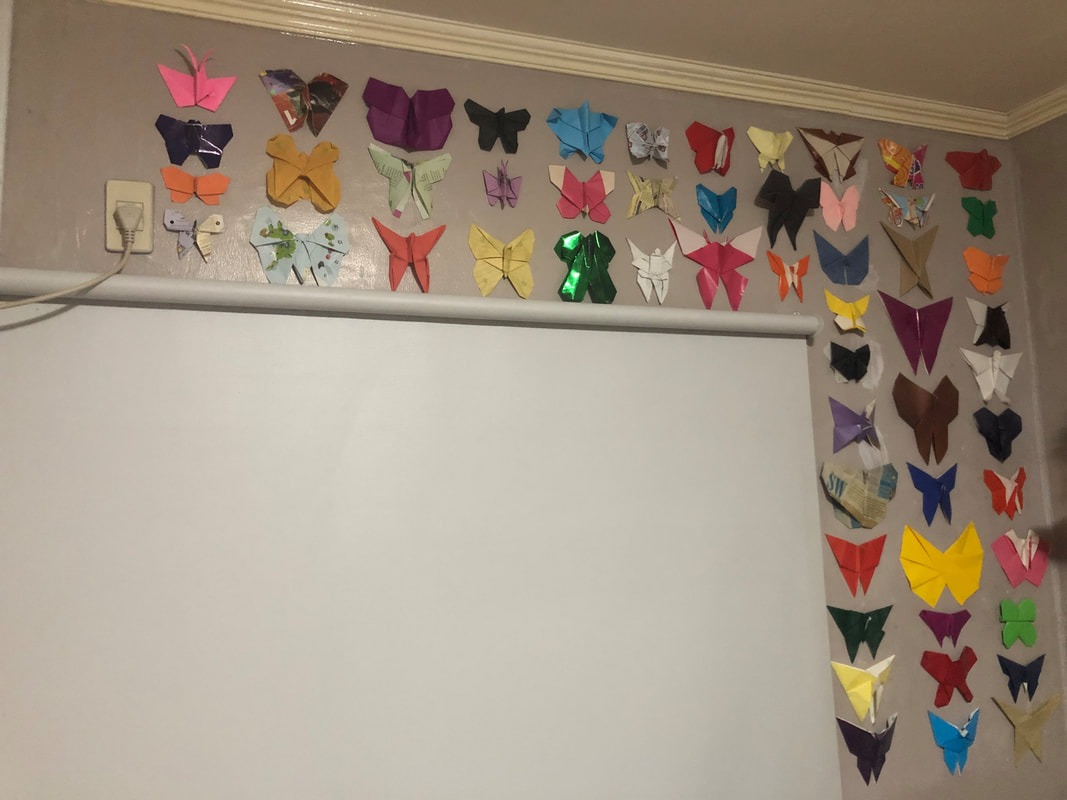 - end -
No, I didn't misspell that.  DIFFICULTY: This is pretty much just a waterbomb base butterfly constructed with basic folds, so I don't see thing being troublesome for most people. The only thing I will note is that I found it easier to set up Step 7 by folding the entire model in half, shaping the butterfly's wings, and then forming the body via a squash fold. INSTRUCTION SOURCE: I got the instructions from the website of one Joost Langeveld from Netherlands (judging by the site's domain suffix). There's something oddly heartwarming to see these super old school websites still floating around on the Internet. OTHER THINGS: Langeveld's instructions featured special printed paper that resulted in a cute-looking spotted butterfly with a differently-colored body. I usually don't think too hard about the paper's aesthetic itself, but drawing/printing patterns on the paper you're folding with is an extra step you can take to make your models your own. THE WALL'S PROGRESS: 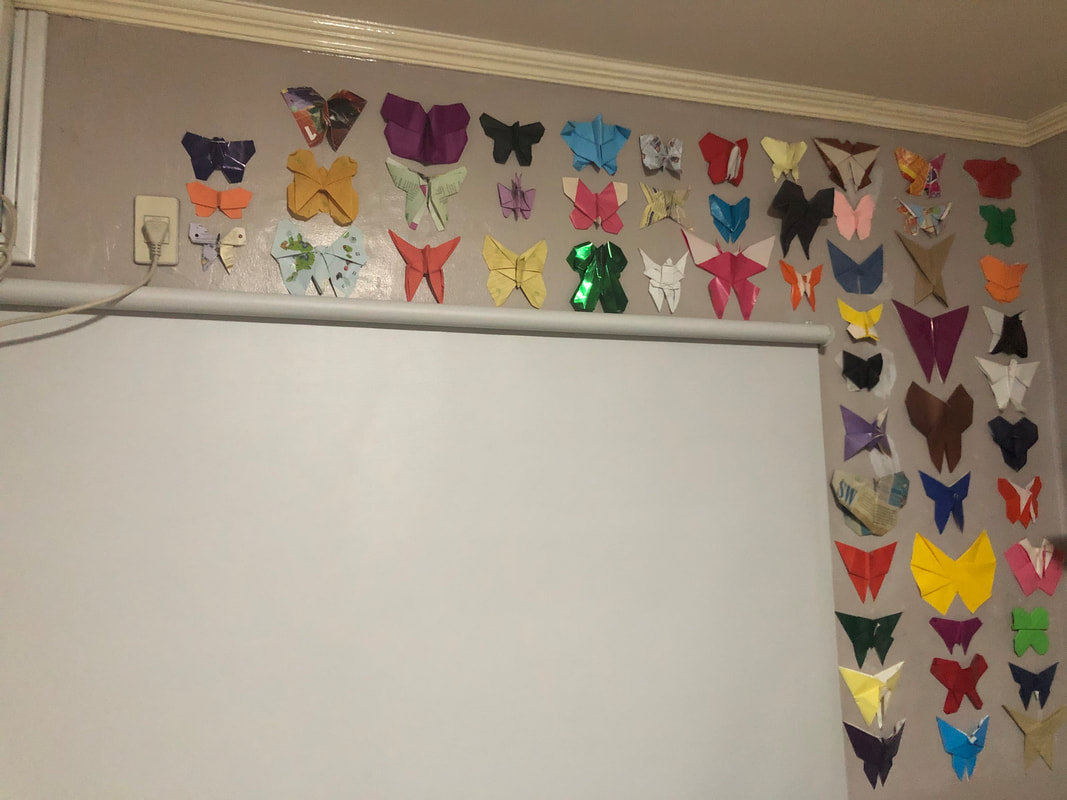 - end -
It was only a matter of time until I folded models of this variety.  DIFFICULTY: Nothing about this model strikes me as hard to make. Pretty much all the folds are simple, and the only thing I could see being remotely tricky is ensuring that the lower wings are symmetrical (I usually have trouble keeping pleat folds symmetrical, personally). INSTRUCTION SOURCE: According to this website I pulled the diagrams for (link here), the model was taken from a book called Easy Dollar Bill Origami by John Montroll. I'm going to wager that the author is the one who created the model (there is usually an indication in origami publications if a model was designed by other people). OTHER THINGS: There's a whole subset of "dollar bill" origami full of models you can fold with your paper money. I generally don't fold my cash (not recreationally, anyway), so I don't have much experience with dollar bill models. They're a fun thing to make if you want to get cute with your tips, though. For this particular model, I simply found a pamphlet-sized rectangular piece of paper, cut it in half lengthwise, and used one half as my stand-in dollar bill. I found that this method worked fine for a lot of conventional paper sizes I had on hand, so if you don't want to use real money (or Monopoly play money), you should try this for dollar bill models. If you're feeling particularly lazy, an A4 size paper cut lengthwise produces decent stand-in dollar bills (and produces larger models compared to ones folded with real money). THE WALL'S PROGRESS: 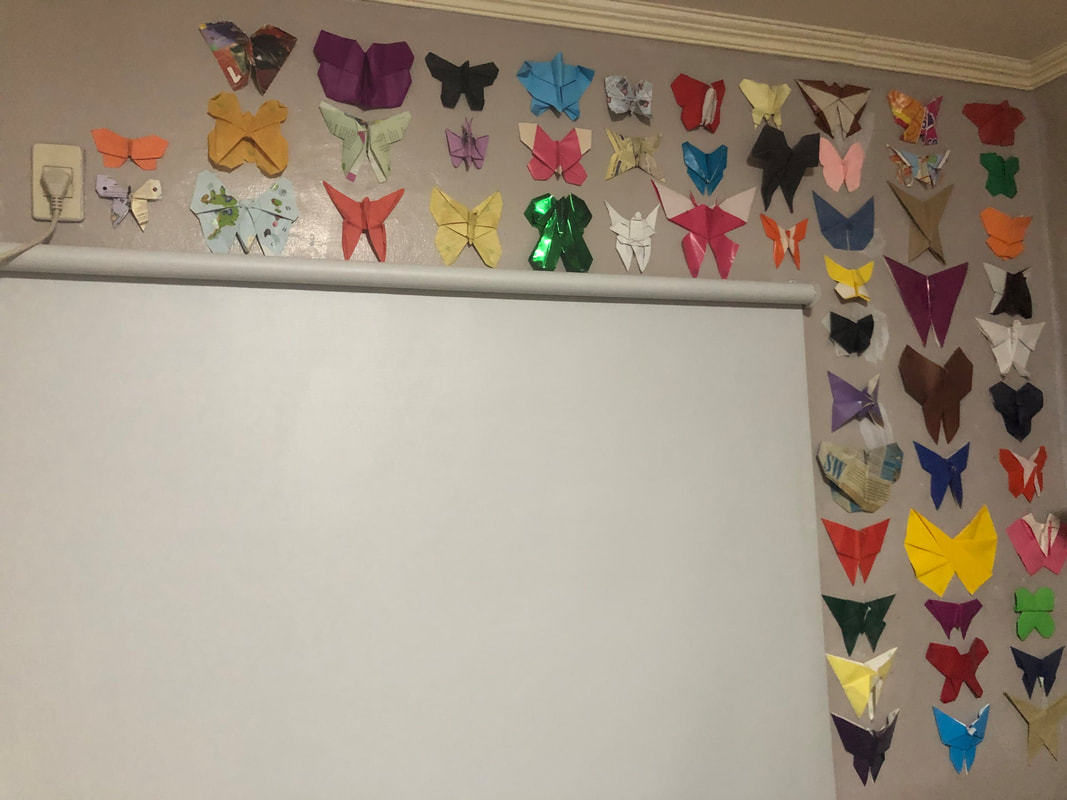 - end -
The section of the wall I'm working on is so full of butterflies, this one is literally sat beside the outlet for the AC unit in my room. 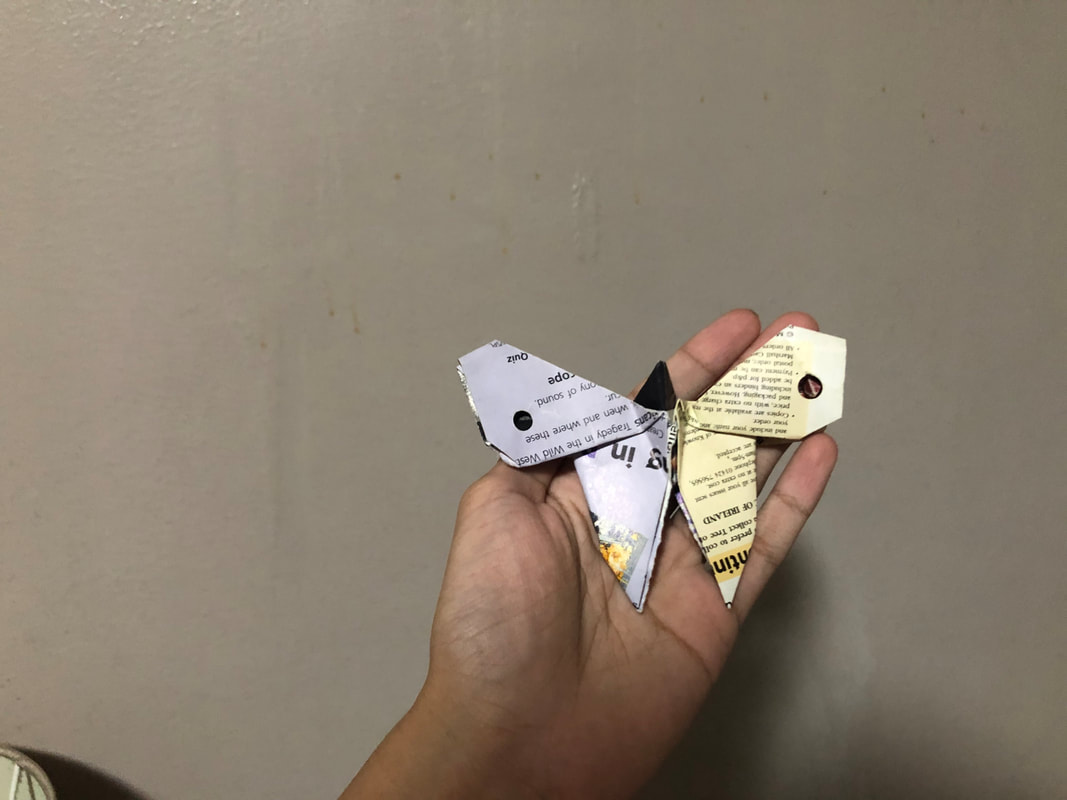 DIFFICULTY: Nothing in particular really stood out to me as difficult when I folded this model. I suppose the only steps that can take a few attempts are the crimp folds that shape the wings (getting them symmetrical might be tricky). INSTRUCTION SOURCE: This model is by Mark Orme, and I retrieved the instructions from what I assume is their Flickr page. Here's a link to the diagram itself. OTHER THINGS: This is another one of those models that starts out with rectangular paper, specifically paper with 2:1 length ratio. Interestingly, this model is named "Bus Ticket Butterfly", though the usual bus tickets in the buses I ride within the NCR don't really have 2:1 proportions. I know this because I've definitely spent hours-long commutes folding models with my tickets. I will note that the step that instructs you to "crimp" the paper isn't really a crimp fold; it's more of a pleat fold. That said, I kind of use the terms interchangeably myself (which, by the way, isn't correct), so me pointing this out is more to clarify for people still learning terminology. THE WALL'S PROGRESS: 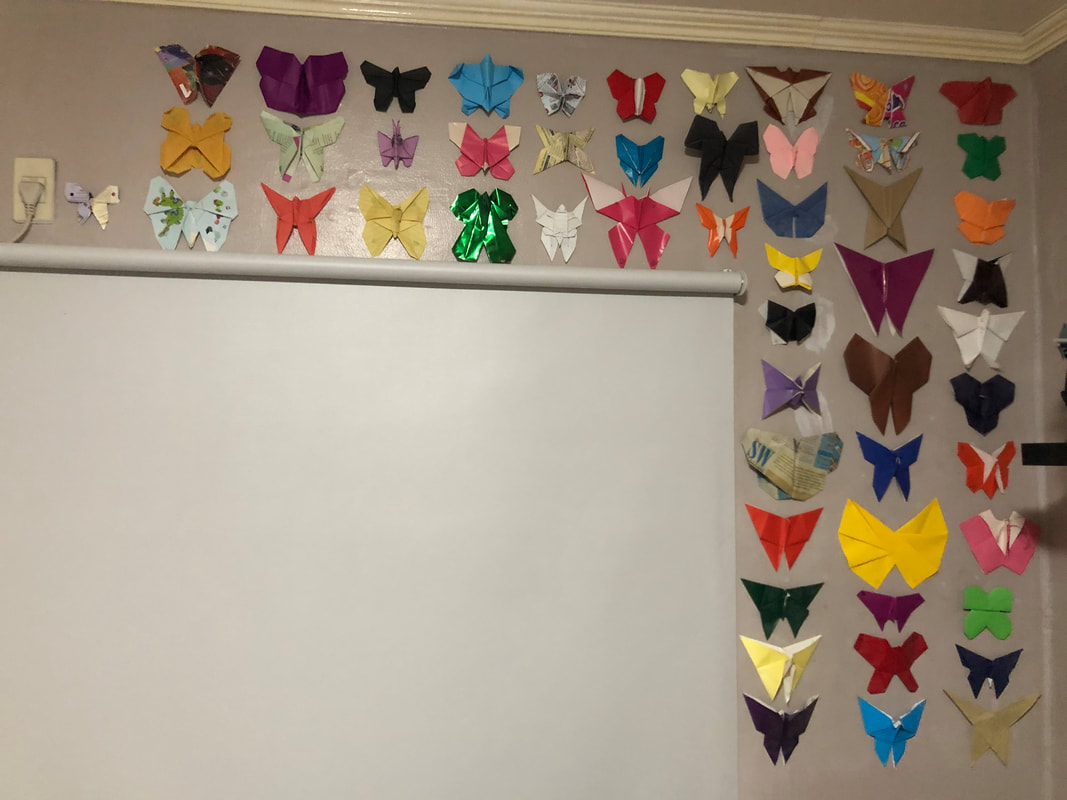 - end -
Well, it's been quite a while since I've done one of these, hasn't it? My last batch of entries to this blog series spanned across three months, and I felt the need to give it a bit of a break for a while. Then when I felt like starting up again, I ran into two dilemmas: one was the familiar "which one do I make" conundrum, and the other was the fact that the side of the wall I was working on has pretty much run out of space. There's still a couple of spots left on the area I'm sticking these butterflies to, but after that's all filled, I'll have to really think about where to place future entries (if ever I still have models I want to fold at that point). As such, I'm not really rushing these next few butterflies, so these posts may be very spread out in terms of publish date. Anyway, onto the butterfly itself. 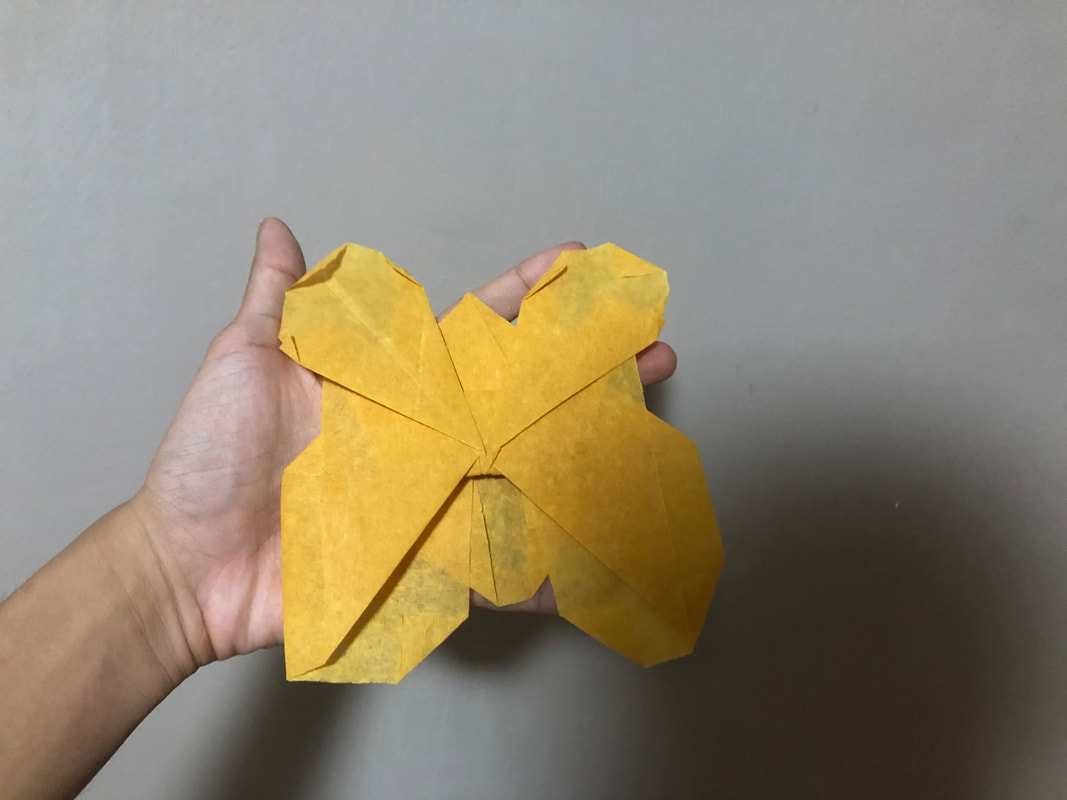 DIFFICULTY: The only aspects of this model that I can see giving some people trouble is the two petal folds (which can take a bit to get right without guide creases) and keeping the squash folds symmetrical. Other than that, most of this butterfly is basic folds on a waterbomb base; nothing too fancy. INSTRUCTION SOURCE: The diagram I found states that this model is by one "J Cole". I'm gonna hazard a guess and say it wasn't the famous rapper who made this. As for where I retrieved this, this was another one I found on Pinterest (yes... I still use it sometimes). The only problem with Pinterest is none of the people who pin shit on there bothers to source what they find (or the sources are secondhand themselves), so I can't trace exactly where this diagram was taken from at all. My best guess is it's some sort of print material that was scanned, but as you can imagine, looking up "J Cole" on Google pulled up nothing but the rapper's Wikipedia page and his various social media accounts. Regardless, here's a direct image link if you want to make it for yourself. And if any brilliant sleuth out there can figure out where exactly the image was taken from, please let me know. OTHER THINGS: One thing I found odd about the diagram is that it starts you out with a color-side-out waterbomb base, and the final model is predominantly the blank side in terms of color scheme. If you actually want to utilize the color of one-sided paper, start folding color side up to essentially invert what you get at the end. The diagram also doesn't quite clarify which orientation of the model is right side up (the final step has the butterfly "fluttering" on the page). The way I stuck it on the wall is my best guess, but the upside down version of that doesn't look wrong, either. I made this with crepe paper, and folding with it is slightly nerve-wracking with how delicate it is. I wasn't sharpening my creases as much in fear of tearing the paper with my fingernails, and the petal folds were particularly scary since that's a technique that occasionally results in tearing if you aren't careful. To compensate, I squeezed the final model between a book to help flatten the folds. THE WALL'S PROGRESS: 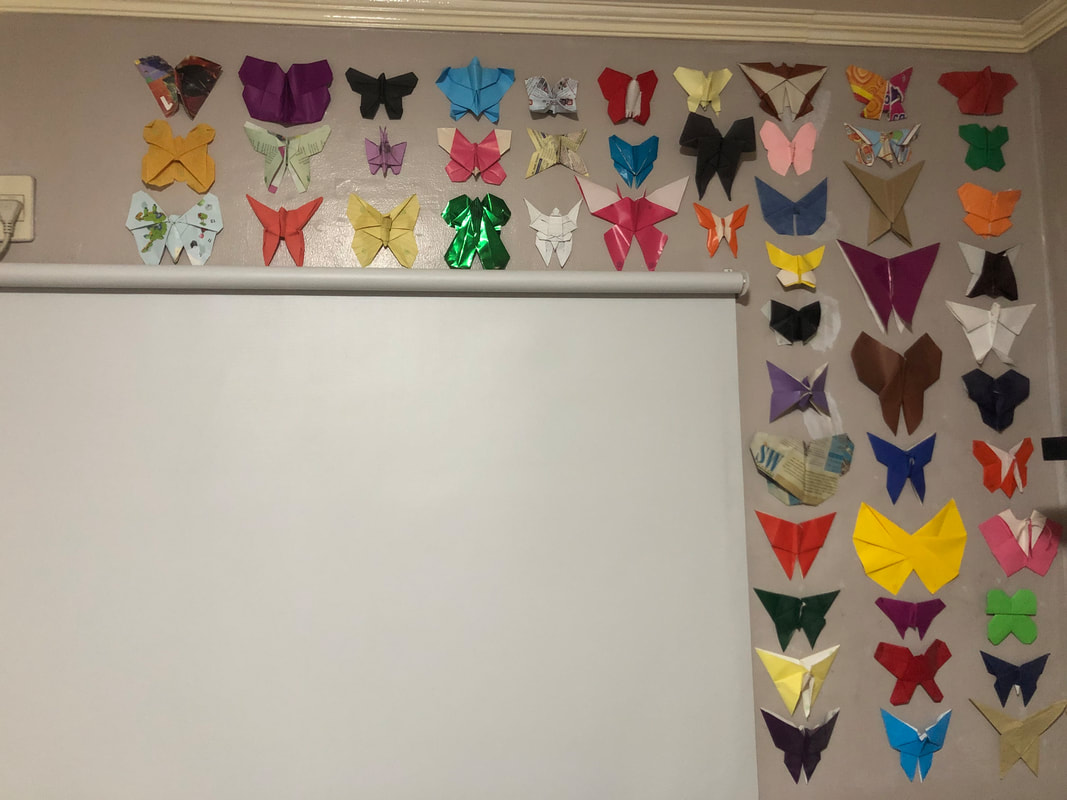 - end -
Squares are fun and all, but sometimes, rectangles are where it's at. 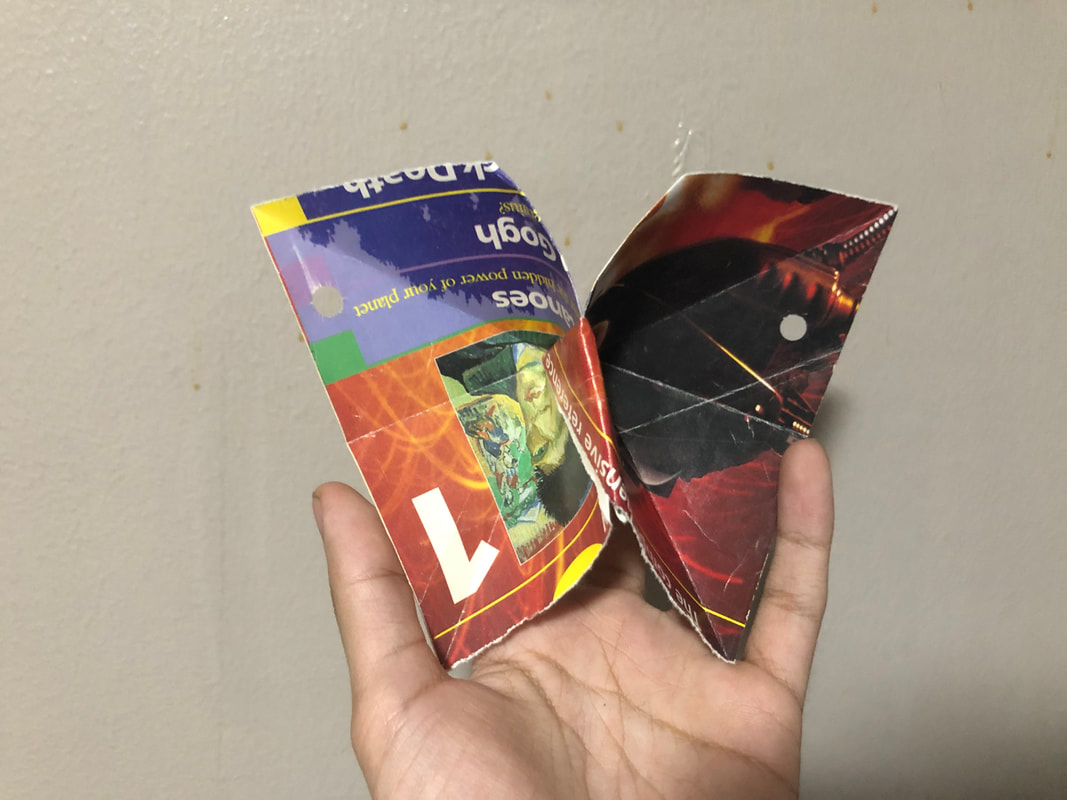 DIFFICULTY: Apart from the one pleat you have to do to form the body (which itself takes only a few tries to get right), most of the construction of this model consists of basic folds. Shouldn't be a problem for novices. INSTRUCTION SOURCE: This butterfly is credited to one Beth Johnson. As to where I got the instructions, I don't remember the exact place I came across it (my guess is it was a lucky find in Google Images), but I was at least able to save the link. Head over here to view the diagrams. OTHER THINGS: This is the first model in this series that starts off using paper with the size ratio 1:2. When I was first starting out in origami, models that instruct me to start off with paper of this size stressed me out, as I figured I had to manually measure out and cut the paper I need (I'm used to preparing squares by hand and not giving a shit about exact measurements). I eventually figured out that there's an easy way to prepare 1:2 paper: just cut a square in half orthogonally. Like the butterfly in Chapter 39, this is one of those models that has well-defined wings with some depth to them. I enjoy the 3D aspect a lot, and the fact that this model is quite easy to make is the cherry on top. THE WALL'S PROGRESS: 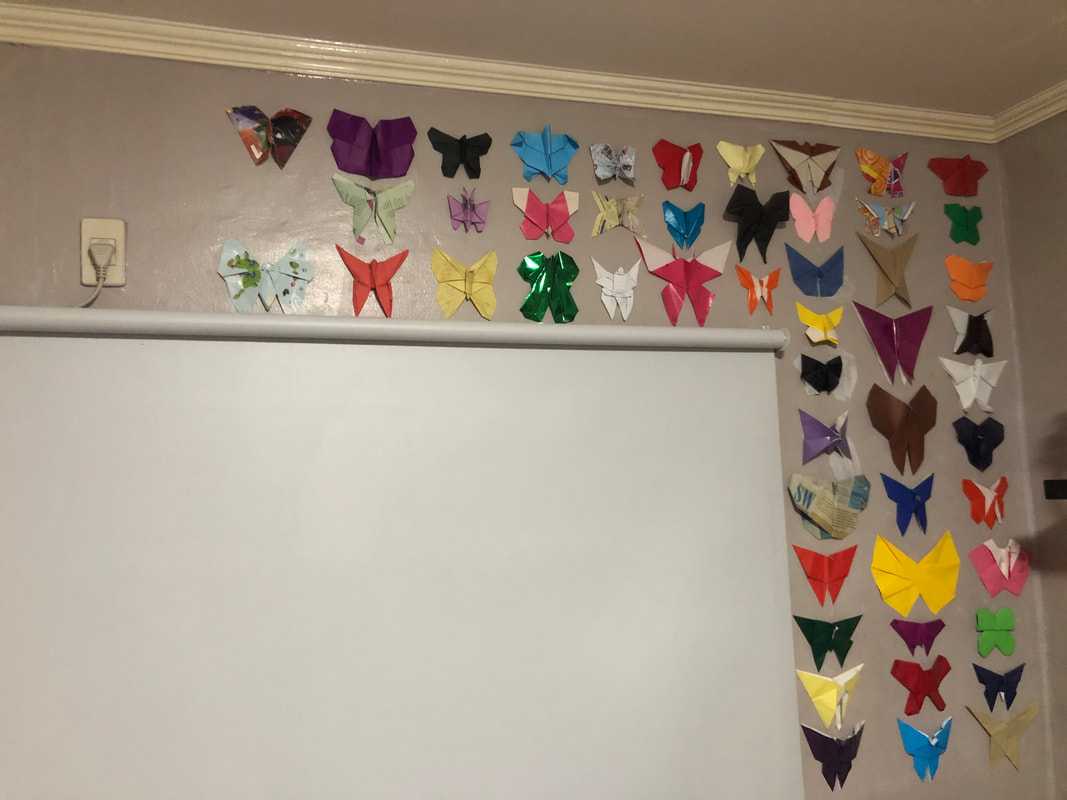 - end -
With this one, I learned the Dutch word for "butterfly" (vlinder), and that marks my eighth non-native language in which I can say "butterfly". 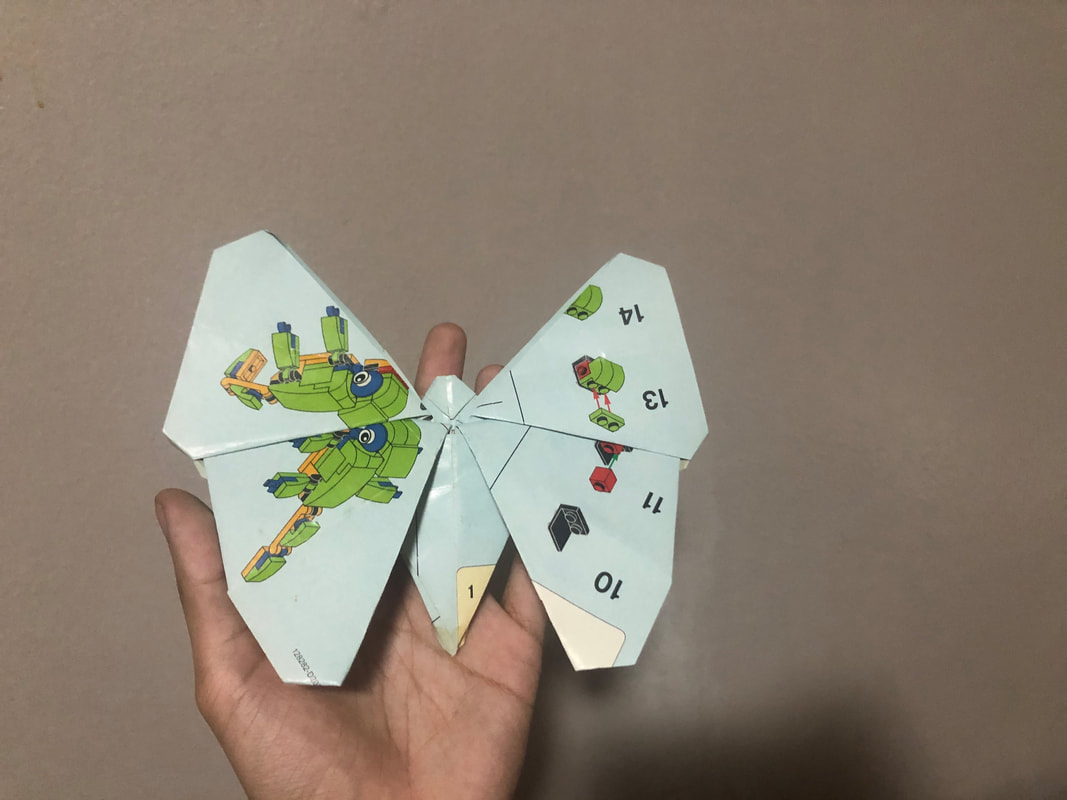 DIFFICULTY: Most of the folds are pretty basic, though there are a few tricky petal folds and squash folds I had to deal with. The real challenge is more on keeping everything symmetrical, as I found out during my practice attempts at this model. INSTRUCTION SOURCE: This model is credited to one Rikki Donachie, and I retrieved the instructions from their website. The bad news is said website has been inaccessible for a long while now, but the good news is Wayback Machine has an archive of the site that you can check out. Here's the link to the instructions for this butterfly (warning: it's a direct download link, which means clicking it will download the PDF file of the diagrams). OTHER THINGS: This model starts out with normal rectangular paper as opposed to the traditional square paper. While that may seem strange given how many butterflies I've folded that start out as squares, origami models that start out with rectangular paper are pretty common. On that note, the creator recommends using paper that's size A5 or smaller. I've tried making this with standard A4 paper, and the final product comes out pretty big, so keep that in mind. You can also experiment with rectangular paper that has a different ratio to A series paper to create slight variations in size or proportion (like US legal size or something). I'm sure it's noticeable in the photo that I used paper with printing for the final model. In this case, I used an extra instruction pamphlet for a Lego set that I own. If, for whatever reason, you're interested in that particular set, here's the instructions directly from Lego's website. THE WALL'S PROGRESS: 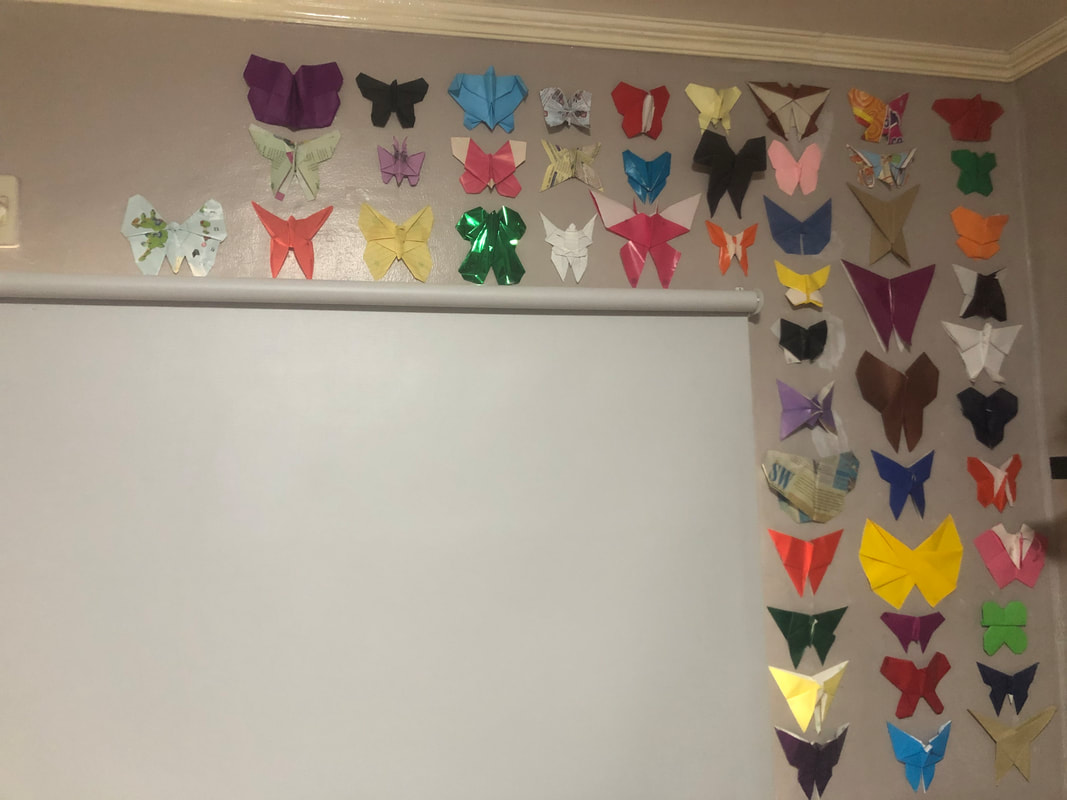 - end -
It took quite a while, but I've managed to make a whole 50 butterflies for my wall! I'm not sure this wall can fit 50 more, but I'll try to get close to that magic 100.  DIFFICULTY: Some of the inside reverse folds and squash folds you'll have to do require quite a bit of precision. Aside from that, however, this is a pretty straightforward butterfly to make. INSTRUCTION SOURCE: This butterfly was designed by Jo Nakashima, who is one of the more popular origami artists of the past decade or so (at least from what I've seen online). You can check out the instructions directly from their website here. OTHER THINGS: If you check the instruction page above, you'll notice that there's a V1 and V2 butterfly. I made the V2 version, as it uses square paper, whereas V1 needs 2:1 paper (which takes an extra step to prepare). Appearance-wise, both versions look pretty much identical, so make whichever version you want. Jo Nakashima also has a YouTube channel, and you can watch the video for making the V2 butterfly here. Although I strictly prefer going off of diagrams when making origami models, videos like this do help with clearing up steps that I may not understand initially from the diagrams. THE WALL'S PROGRESS: 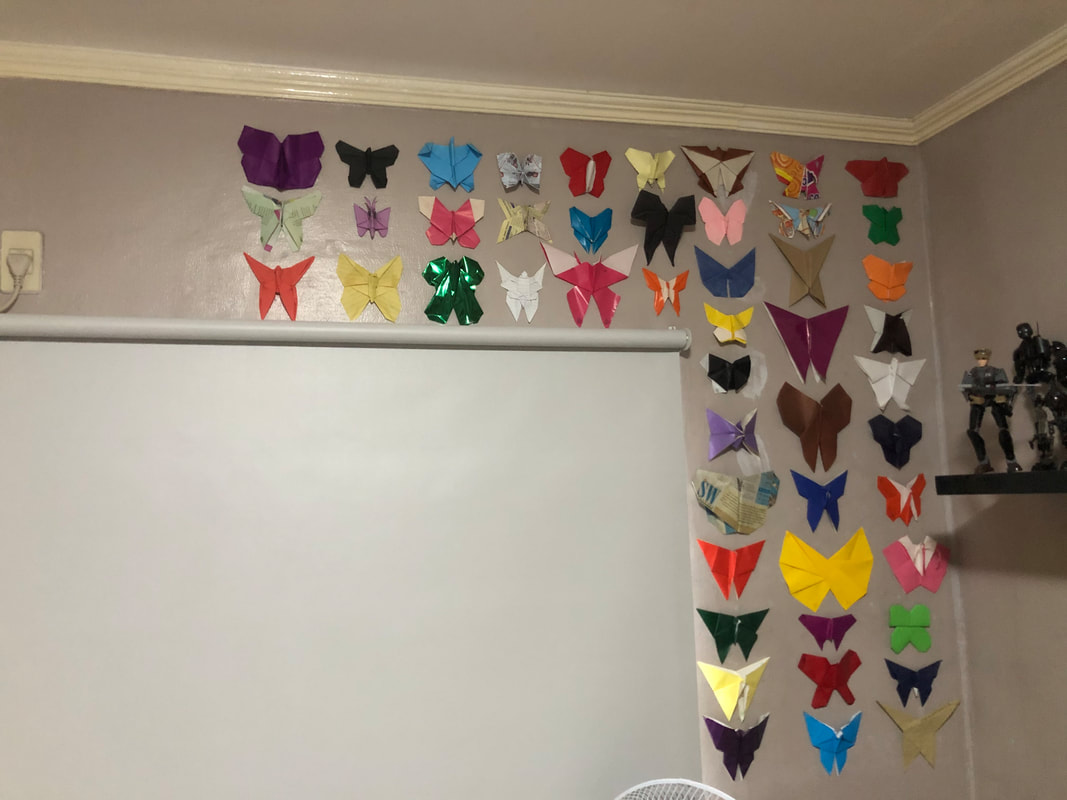 - end -
Origami can be a delicate art, but in this case, I had to be extra delicate. 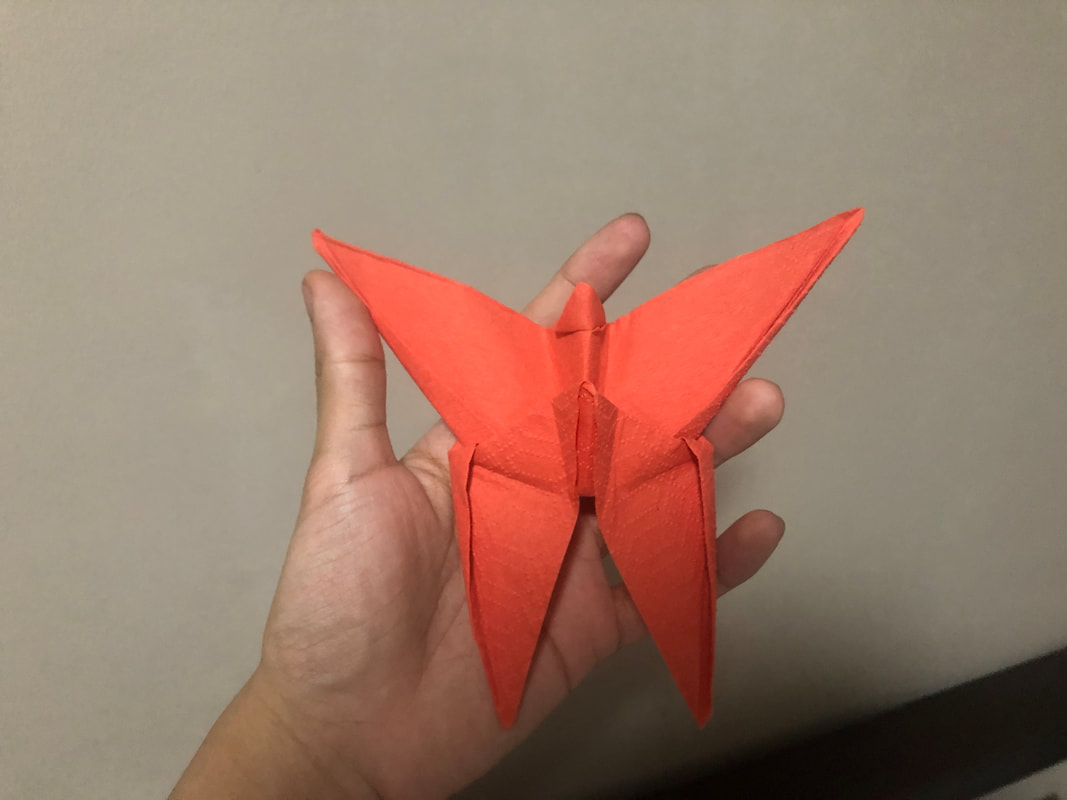 DIFFICULTY: This is another spin on the usual waterbomb base butterfly, and its initial construction is similar to that of Chapter 41's butterfly. Compared to that, this one is on the easier side in terms of the folds you have to perform. Shouldn't pose too much of an issue for beginners. INSTRUCTION SOURCE: Yep, it's another one from Klaus-Dieter Ennen. Like I said, they had plenty of butterfly models, and I'm trying my hand at making most of them. Check the instructions here. OTHER THINGS: I used a spare table napkin to make this model, and while it isn't particularly fragile, I still had to be cautious with making creases and such. Folding napkin paper/tissue paper isn't all that different from using more standard paper, but there is still the obvious risk of tearing especially if the paper isn't that thick. This is only tangential, but napkin folding (like the ones you see for cloth napkins at fancy restaurants) is a pretty fun subgenre that's worth exploring if you're into origami. You can pull off some of the models with paper napkins, too. THE WALL'S PROGRESS: 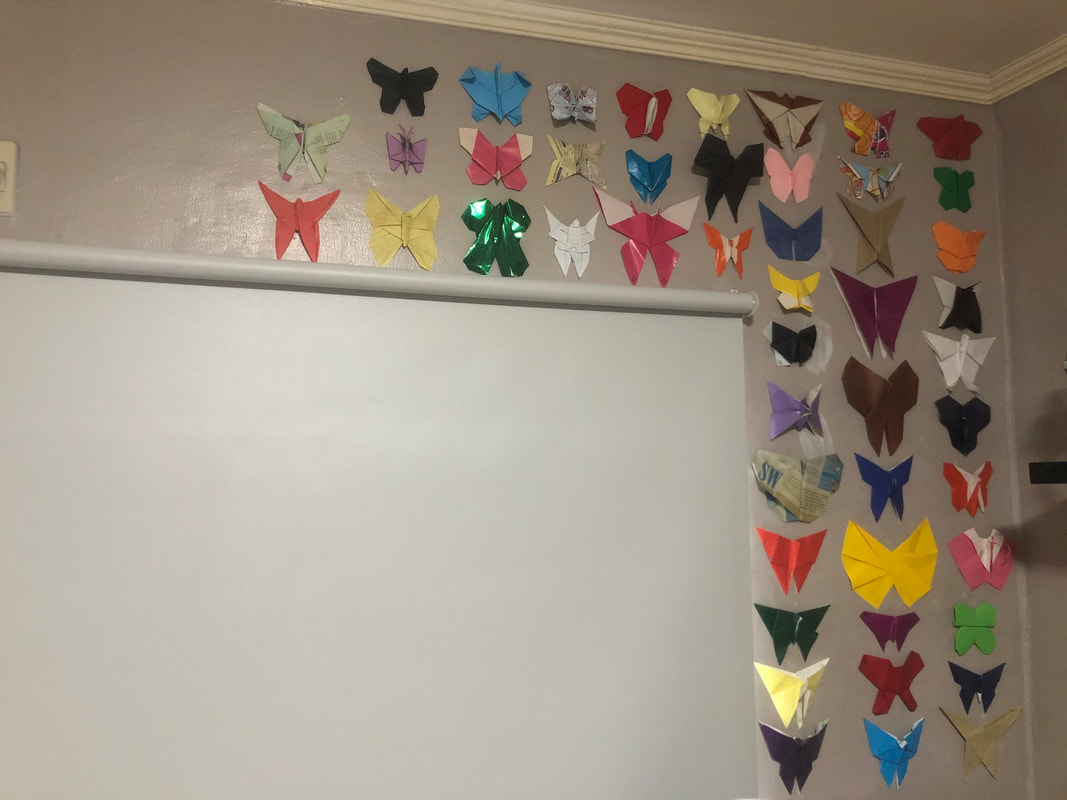 - end -
I think I've exhausted all the colors I had available in my pack of construction paper. I've now been resorting to repurposing unused paper to make these butterflies. 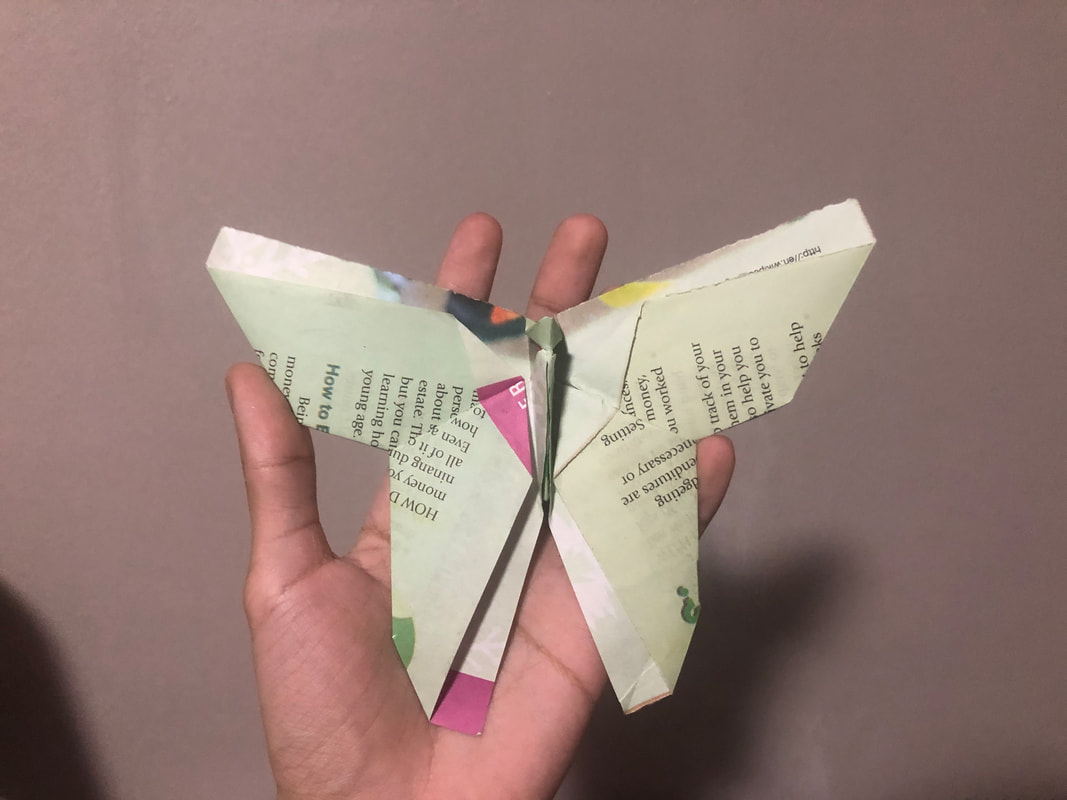 DIFFICULTY: Nothing about the construction of this butterfly is hard at all in terms of folds. Most beginner-level folk can make this with no issues, I think. INSTRUCTION SOURCE: This is another one I learned from Klaus-Dieter Ennen. Here are the instructions from their website. OTHER THINGS: Ennen still has a whole bunch of butterfly diagrams on their website, so expect the next few additions to the wall to be of their design. THE WALL'S PROGRESS: 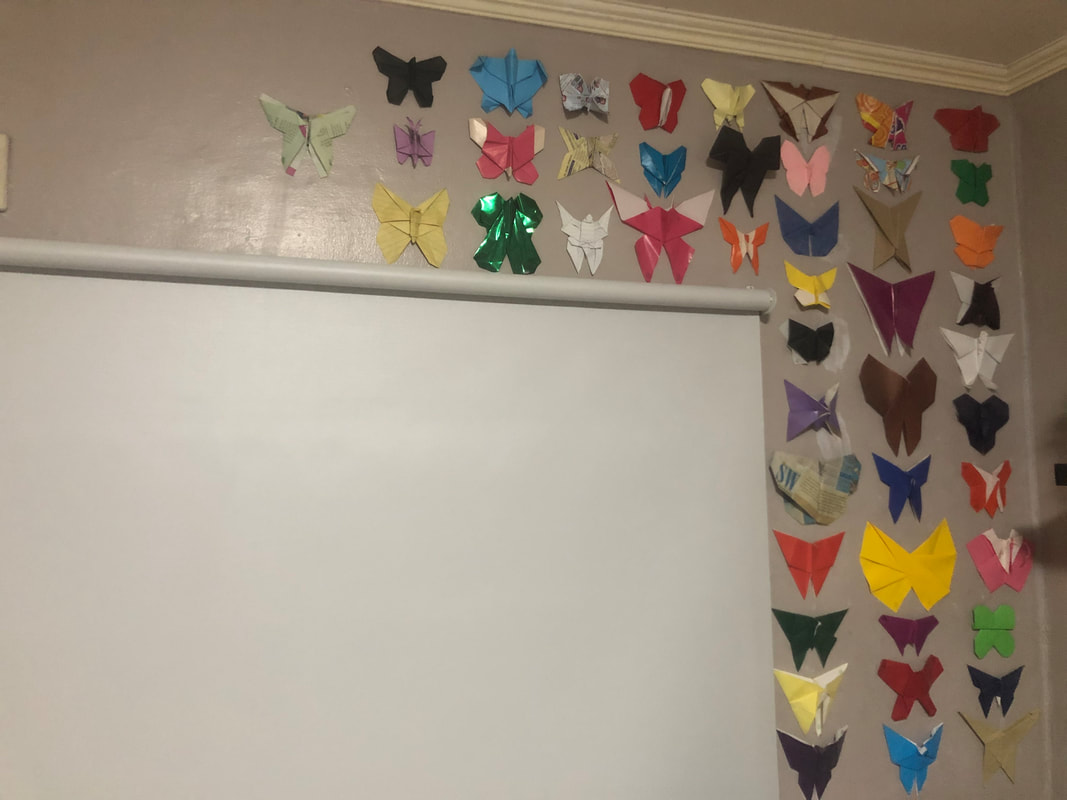 - end -
Throughout the course of this project, I have learned how to say "butterfly" in six different languages (excluding the two languages I speak fluently). Today, I add a seventh language to the list: German. For reference, here are the words I've learned:
 DIFFICULTY: The only particularly challenging bit I encountered while making this butterfly were the few outside reverse folds required to shape the wings. Other than that, most of the construction involves rather basic folds. INSTRUCTION SOURCE: This was designed by Klaus-Dieter Ennen from Germany, and I got the instructions from their website. OTHER THINGS: I think this butterfly would look great if you use paper with different colors on either side. Consider that if you want to make this one. THE WALL'S PROGRESS:  - end -
Butterflies come in all sizes, even in origami. 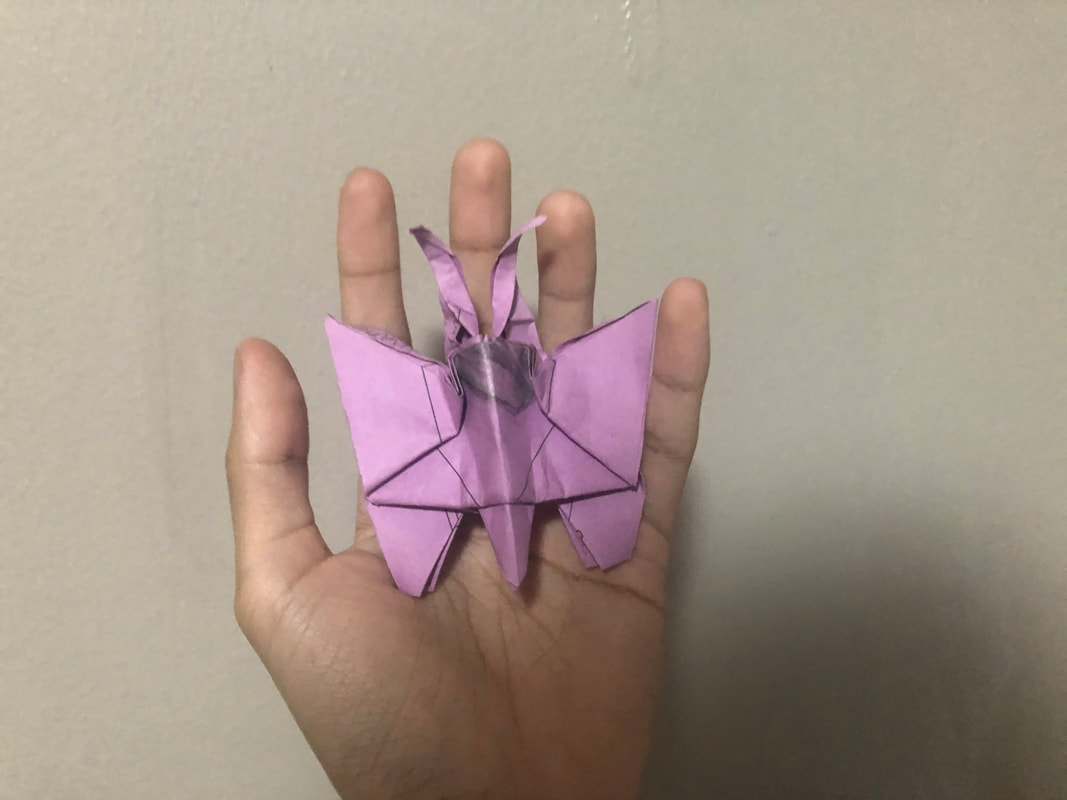 DIFFICULTY: Apart from a few tricky squash folds, this is a decently easy butterfly that isn't too complex in terms of folds but still requires a good level of precision to make. It's not quite beginner-level, but if you already have a bit of experience making other models, you should be OK. INSTRUCTION SOURCE: This was designed by a Malaysian fellow named T.P. Kong, and I got the instructions from their website. Here's a link. OTHER THINGS: This model is pretty compact. I used a square made from A4-size paper and the final product ended up substantially smaller. Consider using bigger paper if you want a larger butterfly. Also, given how compact it is, the paper can get considerably thick at certain spots. Be wary of using thicker types of paper when making it. I was pleasantly surprised by this model. Not only does its considerably smaller size set it apart from the other butterflies I've made so far, but it's also the second model here that has antennae. I love little flourishes like that in origami models. Also unique is how the butterfly's construction starts out with a crane base, which (if I recall) is also pretty uncommon across all the designs I've encountered. THE WALL'S PROGRESS: 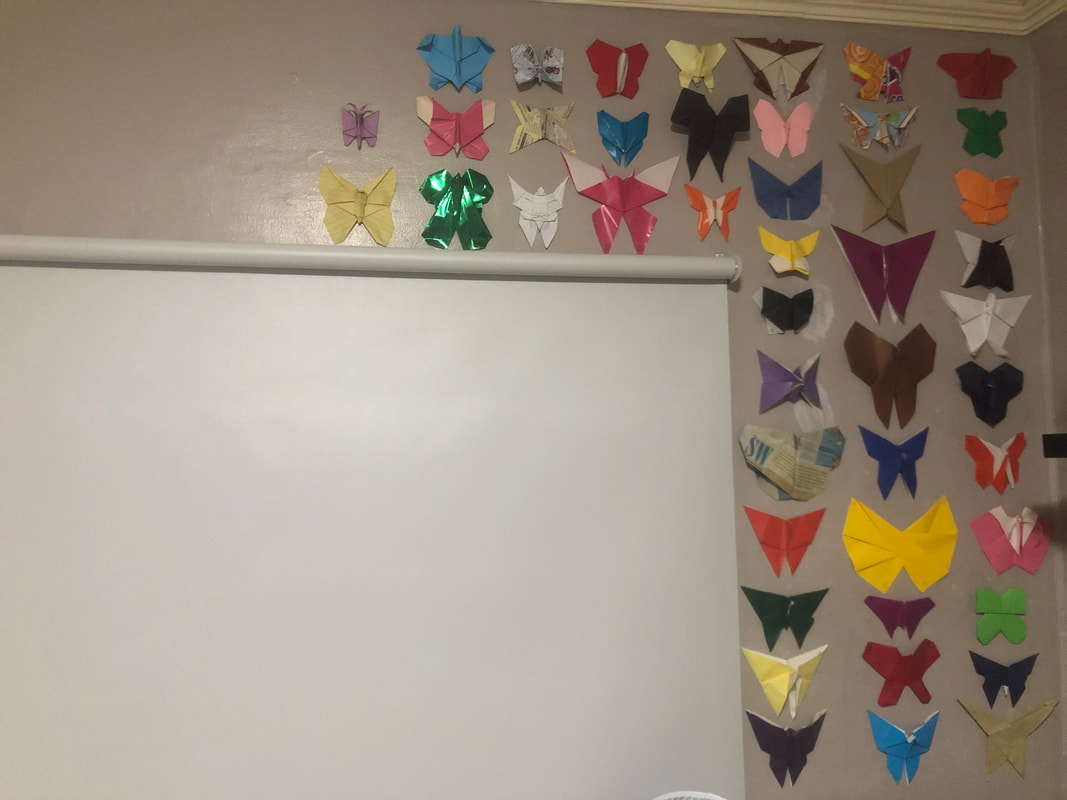 - end -
And just like that, we're close to 50. 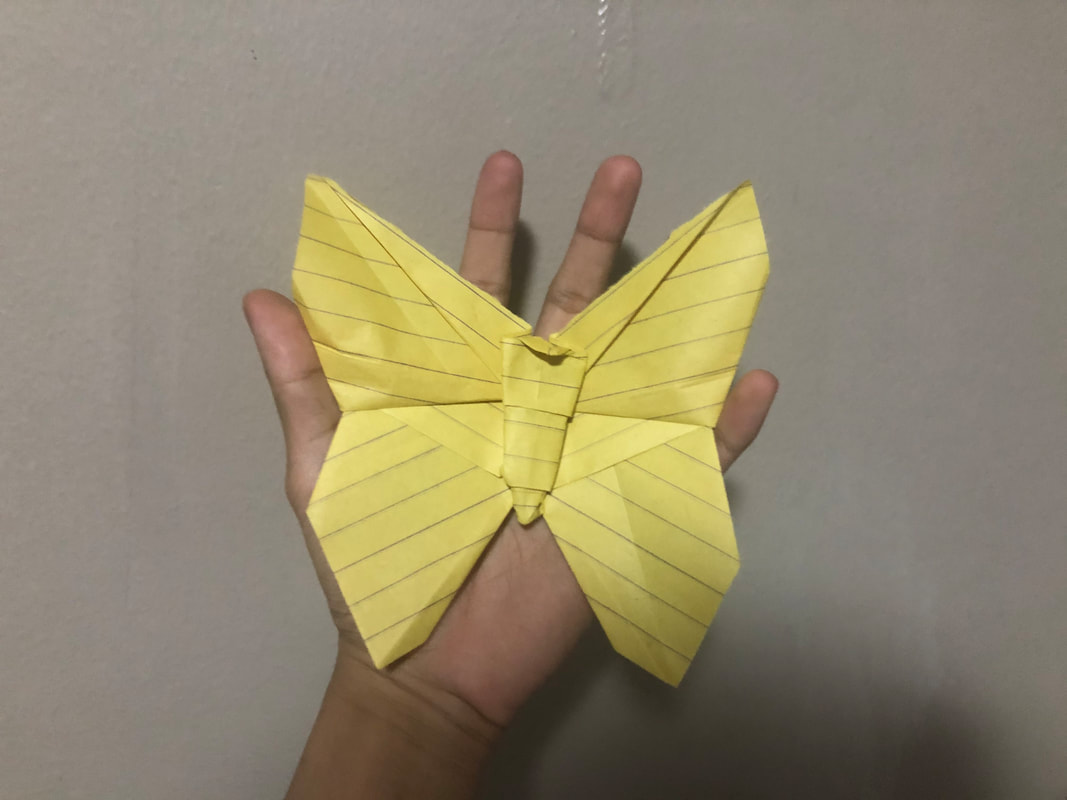 DIFFICULTY: This is a more intermediate-level butterfly, as it requires some more complex techniques to make. You'll be doing swivel folds, tricky squash folds (that take some effort to set up), and precise folds to tiny bits of paper to form the wings and the body. It took me a couple of tries to get this model right. INSTRUCTION SOURCE: The model here was designed by Peter Engel, and it was published in his book 10-Fold Origami. OTHER THINGS: I like this butterfly a lot. It takes some doing to construct, but the end result is well worth the effort. THE WALL'S PROGRESS: 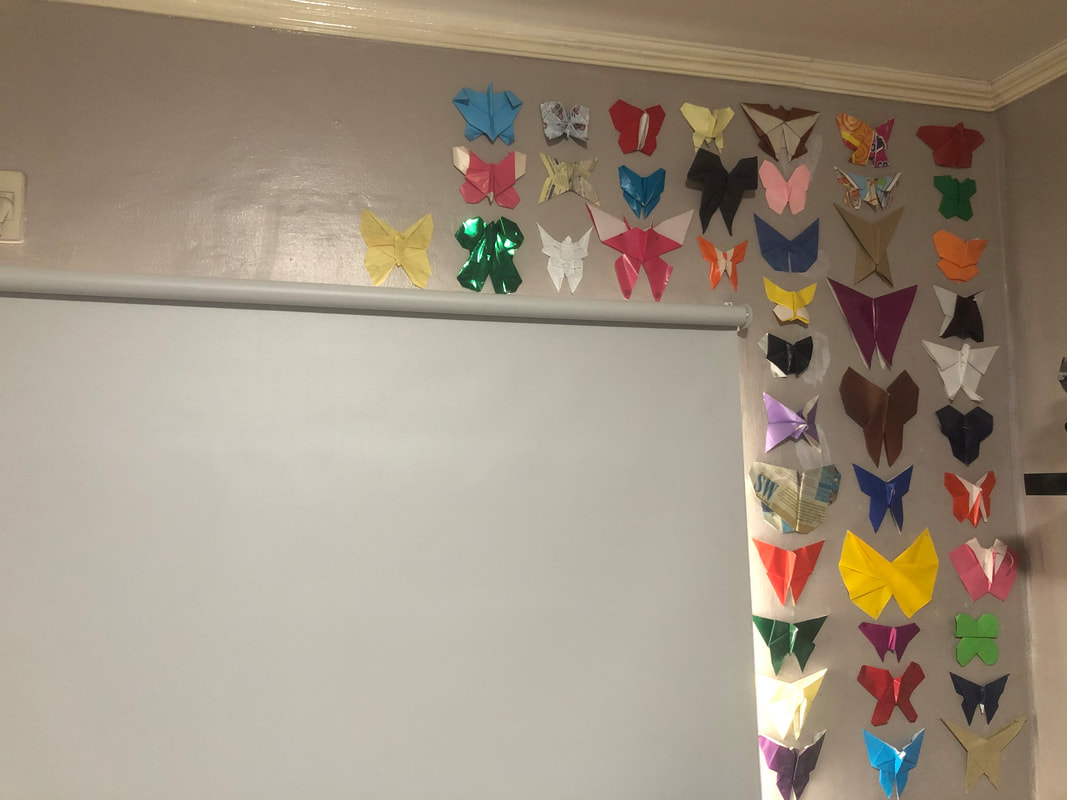 - end -
|
Categories
All
Archives
May 2024
Derryck
|
 RSS Feed
