|
Mosaics are very popular in the Lego creation scene. While most Lego displays in places like LegoLand or a Lego store are full-on sculptures, dioramas, or scale models of things, mosaics appear pretty often, and a lot of the ones you'll see are huge. A lot of Lego builders have likely dabbled or at least attempted to make some form of mosaic, and that includes me. I've just finished a pixel art build (which you can view on my Instagram here), and with that still fresh on my mind, I thought now would be a perfect opportunity to write about how I go about building Lego mosaics. I'll cover the building aspect first, then I'll get into how I make custom mosaics. I started building Lego mosaics in 2015. The reason I remember this is because I was taking a course in assembly language (a programming language with a rather steep learning curve), and we had a project that required us to code a short animation. It wasn't some Pixar shit; just something on the level of what MS-DOS games were able to do back in the day. Being the video game geek that I am, I decided to do a short animation of Mega Man shooting his Mega Buster. You might be wondering why I'm sharing this anecdote; to that, I respond with this photo of Mega Man's sprite from the original NES games: As you can see, video game sprites/pixel art (especially those from the 8-bit/16-bit era) are essentially mosaics, with your "pieces" being individual pixels. To make the above image, I had to fill in each square with the appropriate color. While working on the animation, I thought to myself, I could probably do this, but in Lego. After I finished the animation, I brought out the bricks and got to work. This was the result: 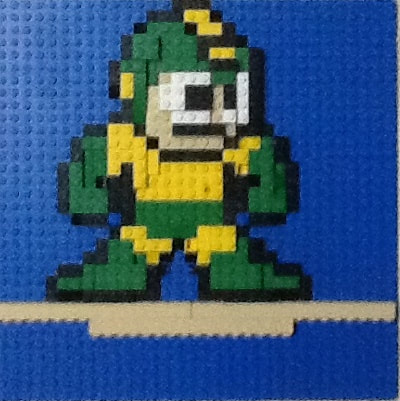 Working on this first build made me realize something: it's not the build itself that's challenging. All one has to do is have a template (in the case of pixel art from games, I use a sprite sheet; you can get sprite sheets of games over at spriters-resource.com) and follow it, with one stud equal to one square unit. Simple enough, right? It is, but it becomes a challenge when you realize that you don't have unlimited resources. If you have a massive collection of Lego pieces, resources aren't an issue. However, I don't have the luxury of having all the pieces I want. The fact that I don't have pieces in a certain color, and a lot of the pieces I have are hard to use (or straight up useless) in a mosaic severely limits the kinds of images I can make. But, as I like to say: limitation breeds creativity, and managing the resources I do have to make the image I want is where all the fun lies. Look again to the above image. Notice how the pieces aren't on the same plane; that is, some are raised more than others. This is a consequence of having limited resources. If I had my way, I'd just build every mosaic using only 1x1 plates in varying colors, and everything would look perfectly level. Unfortunately, a) I don't have access to, let alone can afford to acquire such resources, and b) there's no fun in that. As such, I have to work with what I have, and what I have presents two hurdles when we're talking about building mosaics. One of these aforementioned hurdles is the problem that having a wide variety of pieces at my disposal poses, Variety is usually a boon when discussing Lego pieces, but when it comes to mosaics, that same variety can prove to be detrimental. Sure, I may have a good amount of pieces in a certain color that I need, but they're all different types of pieces. I'd have plates, bricks, and slopes in green, for example, but the nature of each piece can affect where I'm able to place it relative to other pieces; hell, some types of pieces are straight up unusable in mosaics. In this case, I have to plan ahead and figure out where to use x piece, because depending on the type of piece, I may not be able to use it in other regions of the mosaic. The other (and perhaps more daunting) hurdle I deal with is working with pieces that have vastly different measurements. I touched on this in my previous blog entry, but to reiterate: the unit of length and width when building in Lego is studs. When identifying pieces, you usually specify their length x width in studs (e.g. a 2x4 plate, a 1x3 brick). In an ideal world, you'd work with 1x1 pieces for mosaics, as those pieces are more or less squares, and tiny squares are great for mosaics. Unfortunately, this isn't an ideal world, and I'm stuck with a mix of pieces all coming in different dimensions. This becomes a problem when, for example, I need to cover a 1x2 area with black for Mega Man's eyes, but all I have are 2x2 bricks. While many may find this frustrating, figuring out how to get around this kind of obstacle is the exact reason I love building mosaics. The way I get around the issue I describe above is overlapping pieces. For example, you only need to cover a 2x3 area with orange for your mosaic, but all you have access to are 2x4 orange pieces. You don't have to physically break the piece apart (do not do that, please); just take the piece you already have, and cover up the excess area with another piece. To better illustrate this point, allow me to show you this pixel art build: 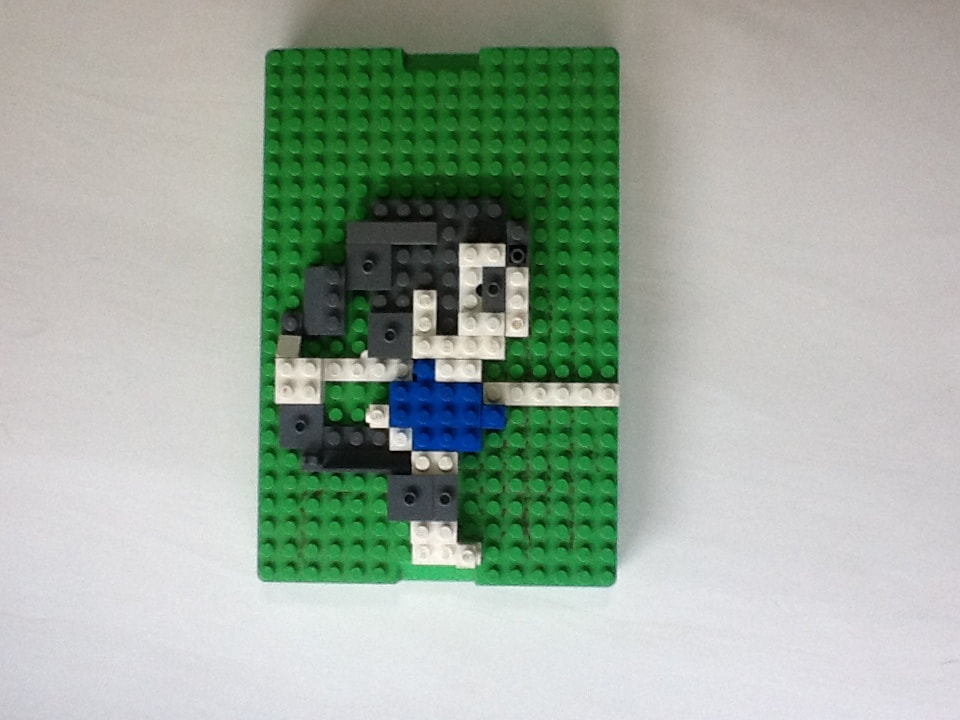 Now, direct your attention to the eye of the character here (the dark gray 1x2 piece). It's not evident in the image, but that piece isn't resting on the base; I attached the 2x4 white plate first, and overlapped the dark gray piece in the appropriate region. That's what I mean. Overlapping allows me to maximize my limited resources and pull off mosaic builds that would otherwise be implausible. Overlapping is not a foolproof solution, however; some types of pieces are tricky to overlap (slopes are a good example of these, because you can't attach shit to the slope part), others are nigh impossible to work with. You'll also have to take into account the measurements of the pieces that you intend to overlap as well; there are cases you may want to use x piece to overlap something over y (the most common reason I encounter is that the use of piece y will be maximized in another region). And (if you care), overlapping is very noticeable and really affects the overall look of the mosaic. If you look through my previous work, you can easily observe where I used overlapping. To summarize this first part, what building Lego mosaics boils down to is resource management. Putting it together is easy; it's when you don't have much to put it together with that it gets challenging.  If you go through my early mosaic work, you'll notice that they're mostly pixel art builds taken from video games. In other words, I'm using pre-existing templates as my guides. After a while, I thought, how about making my own custom shit? My first attempt at this was making custom pixel art of a game character from the modern era. The first problem: this asshole doesn't have pixel art; it has a hand-drawn sprite. So, I had to figure out how to convert that drawing into a mosaic template. For my early custom work, I had to load up GIMP and use the Pixelize tool on the image I want to make a mosaic of. As the name suggests, this tool pixelates the image, and I could adjust the size of the pixels as I see fit. Thus comes another problem: I'd have to adjust the pixel size so that it would be a reasonable enough size to work with (if you take a look, a lot of my pixel art work is on a 32x32 base plate, so anything bigger than that is no good). Guess what? Tinkering with the scale to get it just right takes an absurd amount of trial and error, which means it takes too fucking long. And that's not the only issue I have to contend with, either; I also have to edit the image so that it's in colors that actually exist as Lego piece colors, and that's a fuck ton of trial and error as well. Long story short: I spent about thrice as long making my template as opposed to actually assembling the fucking mosaic. Because of this, I gave up on custom work for a time. Fast forward a couple months, I discovered photobrix.com. It's a browser-based application that converts images into Lego-friendly mosaics (i.e. it uses colors available in Lego and uses stud measurements). This made custom work exhilaratingly easy. All I needed was to make minor tweaks to the contrast or the HSV values of an image (so that Photobrix churns out a usable image), upload it onto Photobrix, change some settings, and bam, template's ready to go. Custom mosaics tend to be more exhaustive of my resources than building video game pixel art, so I don't do them as often, but at least I don't have to spend my entire afternoon preparing the goddamn template beforehand. You can play around with Photobrix yourself by going to the link above if you so desire. I build this rather sparingly, but another, more specific type of custom mosaic I build is Lego QR codes. They're very easy to build, and the template's equally easy to prepare: I go to goqr.me (a site that lets you generate QR codes), put in the desired website (I usually shorten it with bit.ly), and use the resulting QR code as the template. It's important that the QR code has high contrast against the background, so I specifically use my beige base plate and build the QR code itself with brown bricks. Here's one of my QR code builds below. Try and scan it for yourself (it should take you to my Instagram): 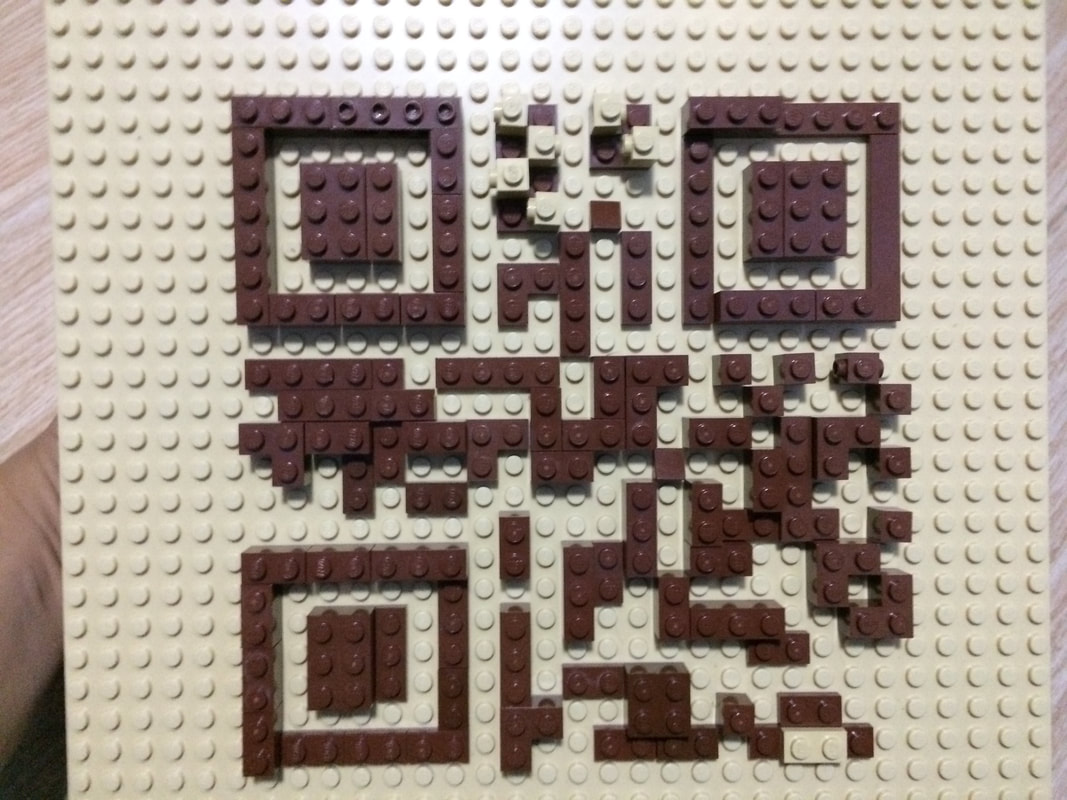 I think I've covered enough ground about my approach towards Lego mosaics, so this is a good place to stop. Hopefully you, dear reader, found this enlightening (or at least mildly amusing) to read about.
- end -
0 Comments
Your comment will be posted after it is approved.
Leave a Reply. |
Categories
All
Archives
June 2024
Derryck
|
 RSS Feed
